Featured Slider

The Teach Me How Collective Is Here!

Big news people!

We recently launched our Teach Me How Collective Etsy shop where you can find a variety of upcycled educational kits for reasonable prices; these instructional kits are perfect for classroom teachers and homeschooling families! I have plans to add a variety of downloadable products as well and many more thematic kits as I continue to collect materials.


I've spent many years creating my own collection of language objects for use in my Montessori classroom despite the fact that large kits can just be purchased online, if you have the money to throw down. I sort of enjoyed the hunt and, at the time, it wasn't in the budget.


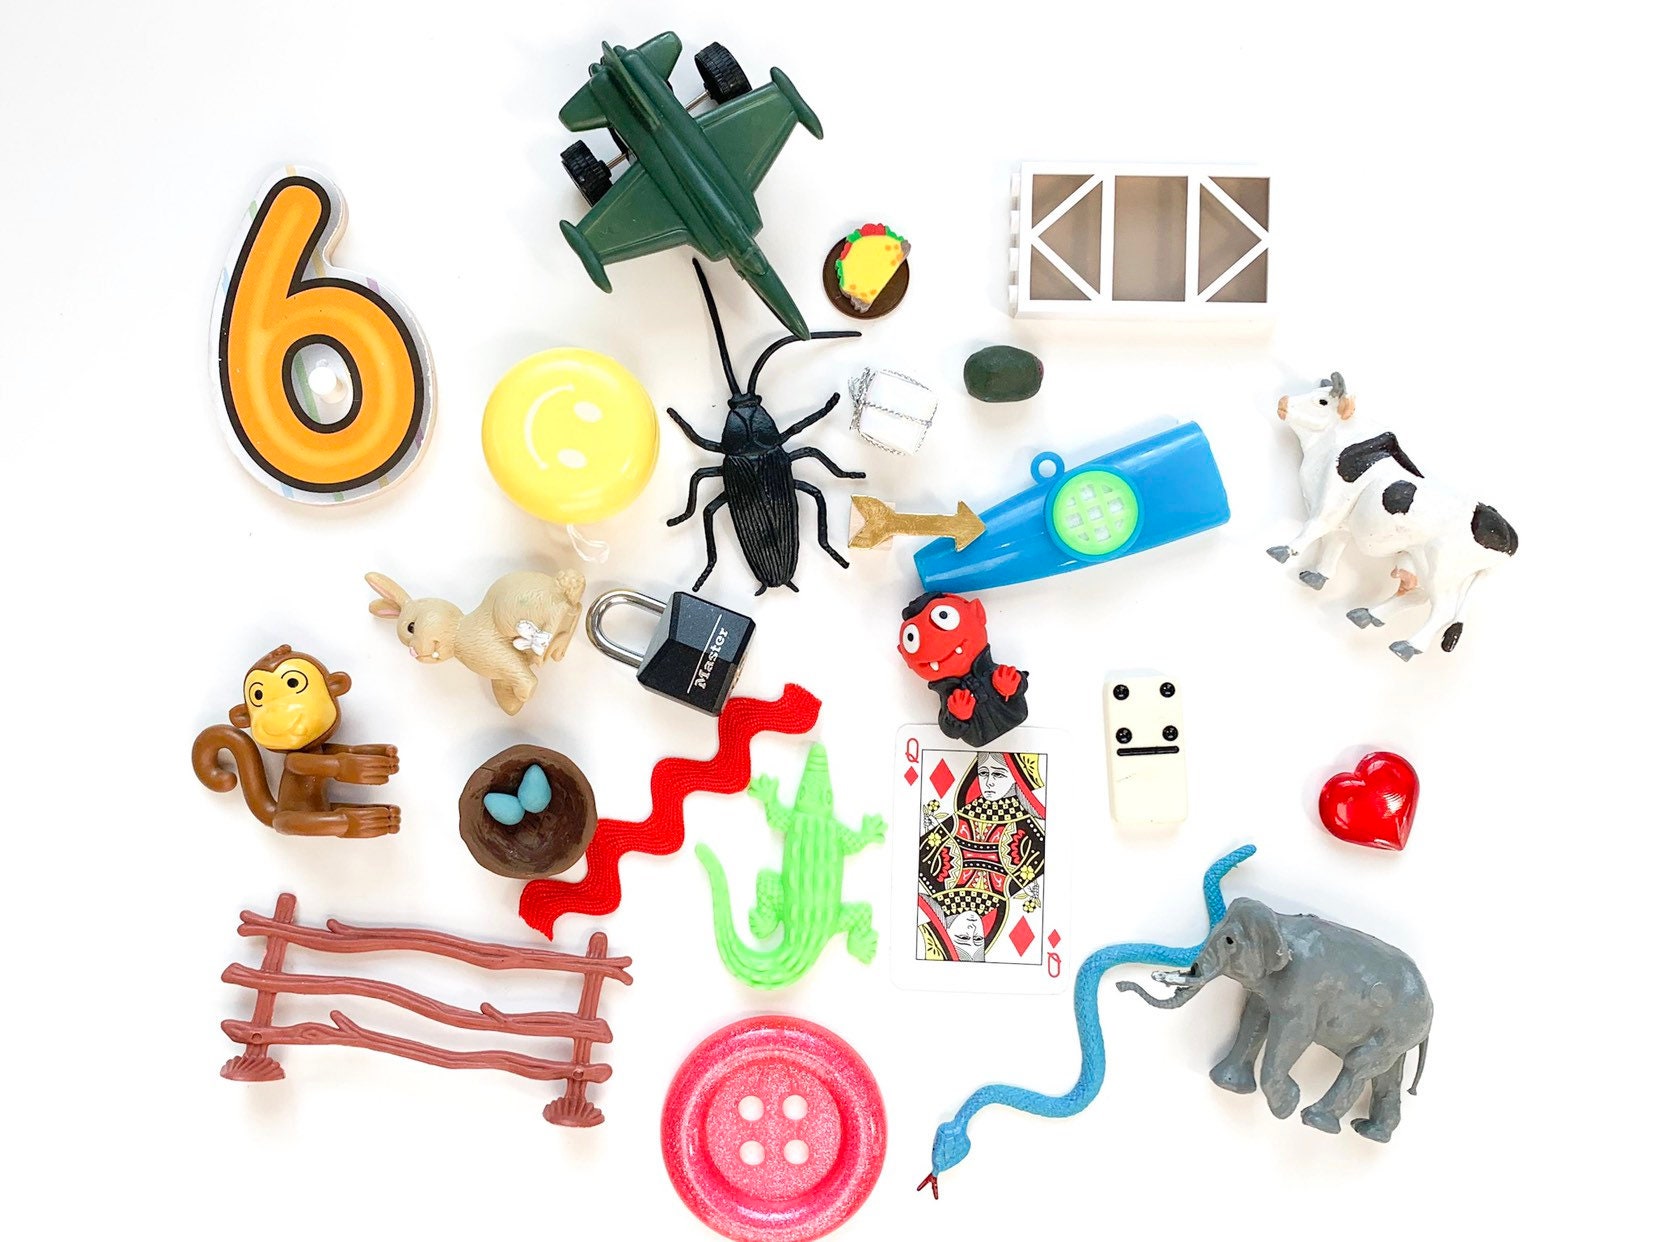
Eventually, I amassed quite a collection of little bitty toys, figurines, game pieces, trinkets and so much more!

My collection was overflowing, so I split it up and created a second collection to leave in my classroom when I had to move to another state. Colleagues have asked me to help them create their own language object collections or find objects for hard to find sounds such a /q/ or /u/. I discovered that I really loved curating these educational kits.... so, I just kept going. That's how The Teach Me How Collective was born.


Our mission at the Teach Me How Collective, beyond saving teachers & parents valuable time, is to disrupt how people thing about trash by finding creative ways to repurpose & reuse items that might otherwise end up in a landfill. This means that the great majority, more than 90%, of the items used in the curation of all of our educational kids are upcycled from discarded games, toys, charms, knick-knacks and other small household items; the rest of our items (such as hard to find objects for letter sounds like /u/ or /q/) are sourced from websites & stores as needed and a few items are lovingly hand-make in house!

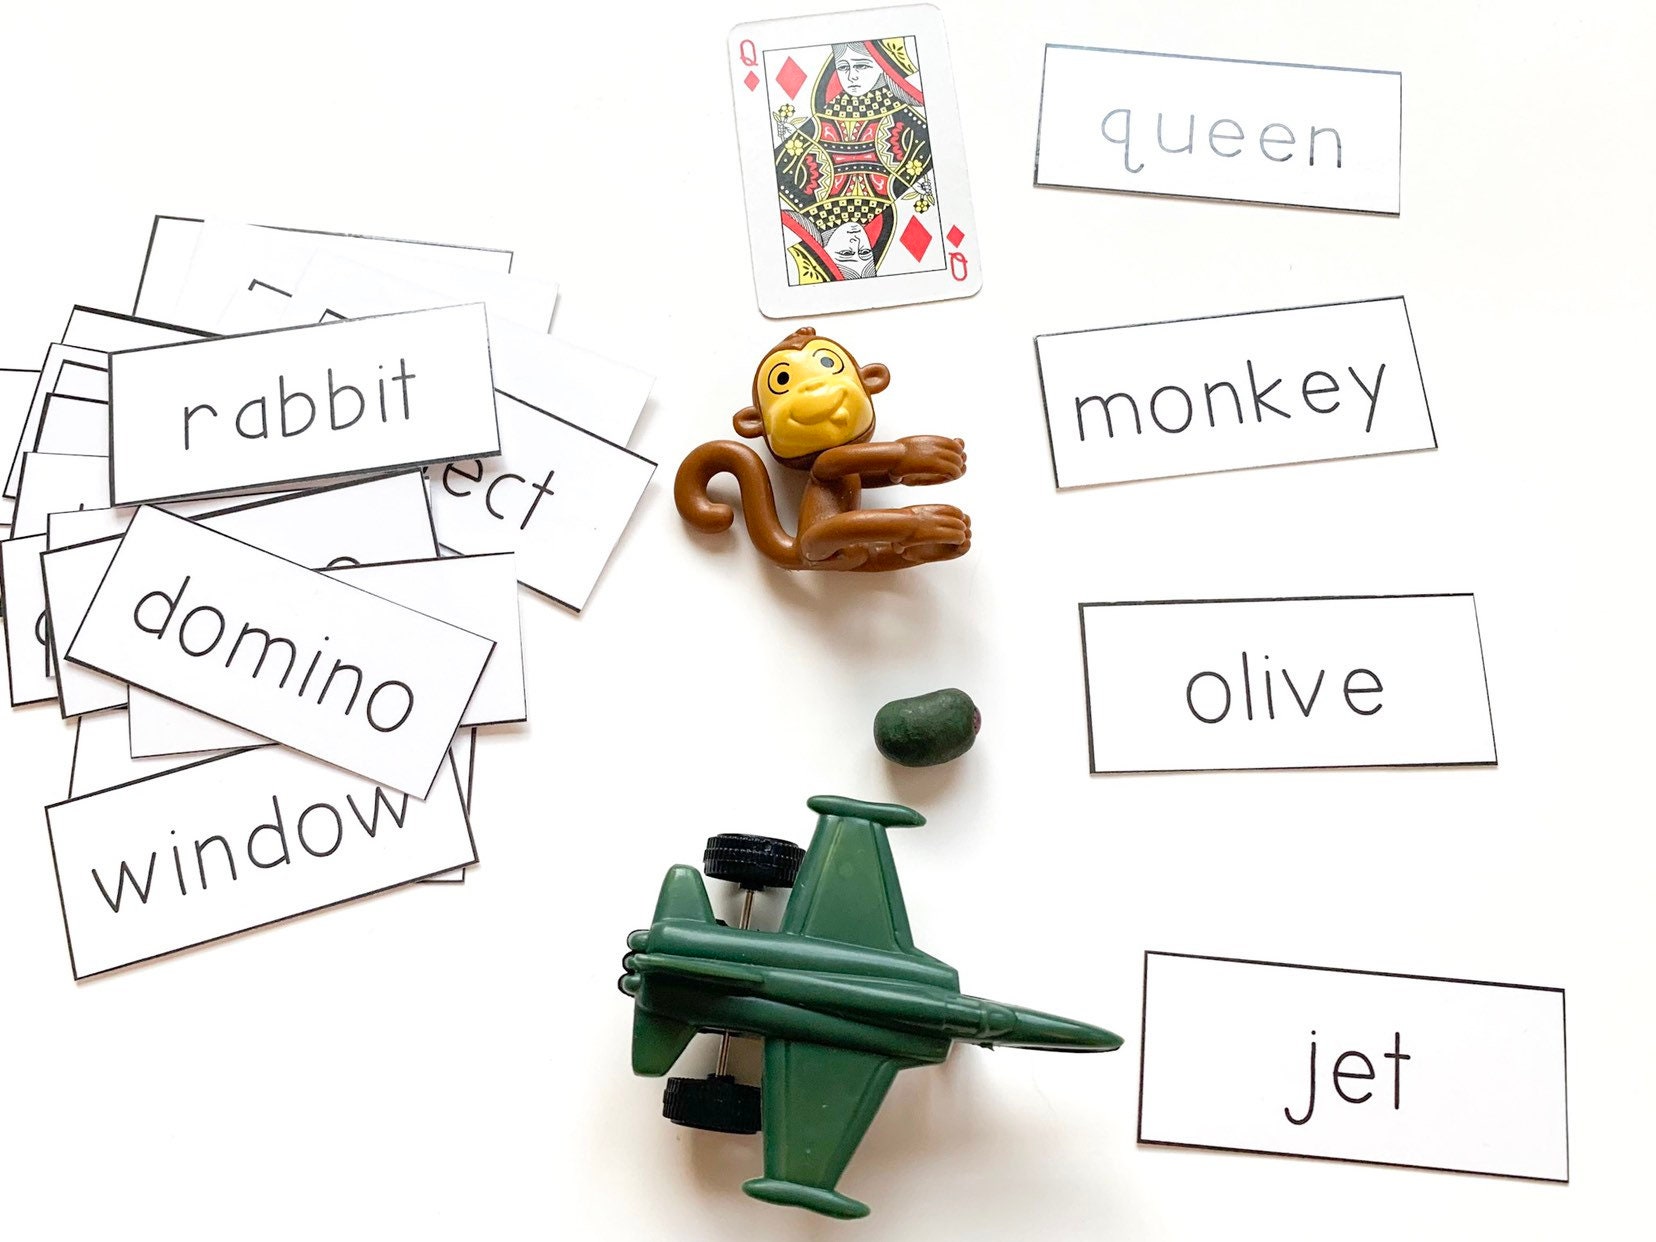
Currently, most of the offerings revolve around Montessori inspired language object sets that are perfect to add to your own language object collection or use for early literacy letter sound instruction. All alphabet sound kits come with 26 objects and printed & laminated word word cards, shipped inside of an upcycled bag or box of some type.


As a sidenote, it's important to mention that due to the repurposed nature of many of our items, some items may show minor imperfections and evidence of a past life (think along the lines of the life of the toys in the movie Toy Story here!). All items in our kids have been thoroughly cleaned and inspected for loose or missing parts; some objects even undergo a mini-make over with a it of touch up paint here and there!


And also, I need to give this WARNING (although it seems common sense) - most Teach Me How Collective educational kits contain small parts that are a choking hazard for young children. Items are not intended for use by children under the age of 3. Adult supervision is recommenced for any an all use of the items contained in the kits, regardless of age.

Have junk? Want to help? The Teach Me How Collective accepts donations of small toys and other knick-knacks. Please contact me via email at erinymedley@gmail.com to learn how to set up a donation!

6 Sanity Saving Ideas for Busy Moms

As my husband prepares to take a job out of state, I've been wracking my brain to come up with ways to manage teaching full-time, commuting, childcare needs, household stuff, parenting our two boys and taking care of myself in some kind of organized and efficient way. We've been apart a few times over the years due to work arrangements (long before we had children), but this time I've got two active little boys, two little dogs & two squeaky guinea pigs to keep alive in addition to myself!

I'm a self-described 'hot-mess-mom' who rarely has it together; I often feel scatterbrained and I'm REALLY good (like master wizard level good!) at forgetting important things like paying the bills on time, showing up on the right day for doctor appointments and filling up on gas before the light comes on to remind me. Sometimes I forget to eat, don't drink enough water or don't get enough sleep and then things feel like they really spiral out of control! Parenting two children alone isn't easy (shout out to all you awesome single parents!), especially when I feel like I can barely keep myself alive some days! If you're one of those moms who really has it together most days, my tips probably won't be all that helpful (you could probably give ME some pointers!).


Here are a few of the simple strategies that I've found helpful for managing my chaos:

1. First & foremost, take care of number one! I wish that I had learned this lesson much, much earlier in my adult life. If I don't take care of my own needs, I won't be able to take care of anyone else's needs. As a teacher, I've applied this concept to my professional life pretty well - you can read about that journey HERE. However, I have struggled to apply it in my non-work life from time to time. Seriously, take care of yourself!


This means eat well, drink lots of water, take your vitamins and medications, sleep as much as you can (sometimes this means that I go to bed at 7:30 or 8:00 with my children), exercise, get fresh air, do something you love, look for moments of joy in your chaos.... squeeze in a bit of self-care every day!


2. Write everything down. Since I forget so many things on a regular basis, I've learned to force myself to write EVERYTHING down -- usually in two or more places. I'm a big paper & pencil kind of person, so physically writing down appointments, sports practices, games and other commitments really helps them stick in my head. Some weeks, I go so far as to write down which days the kids will have baths, what we'll have for dinner (if I actually plan that part) and other seemingly mundane things. I have even been known to write down things that I already did, just so that I can cross them off -- it feels quite good to finish something and cross it off!


I carry a small planner, a mechanical pencil and a few colored pens in my purse all the time - there's often a whole handful of pencils and pens floating around at the bottom of my purse! A pencil is a must for me so that I can erase and change things easily and the colored pens are to help color code things; I usually use one color for my appointments and a different color for each child etc.  I also enter appointments into my phone calendar and set reminders for the day before and two hours before most important things.  The key to this strategy for me is that I absolutely MUST write it down or enter it into my calendar right away - before my mind is on to something else. Periodically I check my phone calendar against my paper planner to make sure they sync up. It's not always neat or foolproof, but establishing this habit has been a real lifesaver in recent months!

My husband thinks that the paper/pencil step of my method is a waste of time, but I think it's essential for me; I NEED to write things down to help remember them. Typing something into my phone calendar doesn't have the same effect as physically writing it down, moving my hands and feeling the pencil on the paper. Figure out what works for you.


3. Pay someone else to do your least favorite task. This idea started out as ' Use a grocery delivery service,' but then I got to thinking that not everyone hates grocery shopping as much as I do. Perhaps there's something else you'd rather pay for someone else to do? I hadn't really thought too much about the idea of hiring someone else to help me with some of the things, but it's been a game changer!

I signed up for a 14 day trial of Instacart the other day and WOW I really love it! So, I got 2 weeks free, but I feel like I got my money's worth on my very first order! It will depend on where you live, so maybe Instacart won't be available in your area, but there are MANY other companies who do the same thing. I was able to get my weekly grocery shopping done in less than 15 minutes! I filled my digital shopping cart with the items that I usually buy. Then, someone else went to the store and picked out all of the things on my list for me. They did all the hard work for me! I didn't need to corral my active children, repeatedly say 'no' their requests for candy & toys or try to race against the clock to finish before my toddler had a melt down.I will happily pay a yearly fee and a 10-20% tip for someone else to do my shopping, load the car and bring it to my house - it saved me time and sanity and allowed me about two hours of extra time to work, spend time with my family or maybe even take a few minutes for myself!

Maybe grocery delivery isn't your thing, perhaps look into having a person or a service help with laundry, house cleaning, yard work, meal prep, taking your kids to and from school etc. While this idea isn't necessarily cheap, weigh the pros and cons agains the cost to see if something like this might be worth it to you. For me, considering at the amount of time and frustration that grocery delivery saved me, I decided it was worth my hard earned dollars to gain a few hours of time each week.


4. Streamline laundry & organize clothing - I also hate laundry, mostly the folding part. My goal is to do one load of laundry per day; I try to always put a load in the washer first thing in the morning before work and then switch to the dryer when I get home. If I can maintain this one load per day quota, I don't fall hopelessly behind and end up with mountains of dirty laundry for the weekend. Folding it is another story all together. Ok, I'll be super honest here, I absolutely HATE folding laundry! I hate it so much that I don't usually fold anything; the best that I usually manage is to sort the laundry into baskets for each member of the household. This method of organization is helpful, but not entirely efficient and I still spend a ridiculous amount of time in the mornings looking for socks and underwear for everyone.


I have tried Marie Kondo's methods and I even binge watched her show, but I simply cannot focus long enough to precisely fold clothes like she does; I just CAN'T  Kondo our clothes! Recently, I started to group my children's clothing into rolled up bundles that include an entire outfit: socks, underwear, pants, t-shirt, sweatshirt. Each week, I try to make sure that I have 6-7 entire weather appropriate outfits for each child and leave the rest of their clothes unfolded and sorted in their designated basket, with the outfit bundles on top. Each weeknight, instead of pajamas, I have my children dress in their outfit for the next day; this works well because my older son refuses to wear jeans or anything that might wrinkle anyway. So, as long as they don't wet the bed or wet through their diaper, they're ready for school and daycare right out of bed -- just add shoes and coat!

5. Food prep on Sundays - The food prep that I'm referring to here isn't anything like an extensive Whole-30 sort of meal prep; I've it that in the past and failed miserably. I'm talking REALLY simple stuff here! Each week, meal prep at my house means something a little different. Sometimes, it means that I buy 10 Lunchables and other times, I might make homemade lunchables by cutting and packing meat, cheese and crackers. I usually put each complete lunch into a large Ziploc bag and keep the bags all lined up in the fridge; to pack a lunch, I just dump the contents of the bags into the correct lunch bag and set the empty Ziploc bags in a pile to reuse the following week.

Over the weekend, I also try to make something that I can reheat for dinner several nights during the week and plan 1-2 crock pot meals that will also have plenty of leftovers. When I fail to plan, we resort to quick and easy things like eggs, cereal or take-out for dinner because both of my children will happily eat these basic foods - for the record, I probably couldn't serve cold cereal for dinner to my husband without getting the side eye!

6. Put all the things in the car for the week - We have sports practice several nights a week and sometimes other things that we need to do. If I can, I try to pack up whatever we might need for the week ahead of time. Each kid has a duffel bag that I pack with extra clothes, drinks, snacks and whatever equipment they'll need; my toddler's bag is filled with a large blanket to play on, baby wipes & diapers, extra toddler friendly snacks, toys & books to keep him busy while we're at his older brother's practices. This way I don't have to stop and waste time and money on the same items from the gas station. AND don't forget things for yourself; I also keep a stash of healthy low-carb diet friendly snacks & drinks, a book (which I rarely get to read), a notebook & pencils (for writing down lists & ideas), extra headphones etc.

Any other sanity saving ideas to share?


Favorite Stories: Room on the Broom!


Currently, my favorite Halloween book is Room on the Broom by Julia Donaldson! My students always love the whimsical story, lively illustrations and the rhythm of the text almost feels musical when read aloud (There is, in fact, a musical version that can be heard HERE!).

I always read the book a few times, do a little dramatic play with some props and then towards the end of the week I show the short animated movie - the kids really love this story!


Since the story is repetitive, it great for having the children join in while reading and to work on retelling skills afterwards. I really wanted my students to be able to engage with this story over and over again in new and different hands-on ways, so I created a few activities to go with it - they can be found HERE

My students' absolute FAVORITE activity is this Build & Balance Retelling activity: 


Students have to balance the broom by carefully stacking the storytelling props on top of each other. I created several printable options including foldable picture props, pictures to attach to wooden blocks (or these BLOCKS), or pictures sized for DUPLO type blocks. Several options make for quick and easy differentiation! 


The foldable stacking pieces are the easiest to balance and the quietest, but are more fragile than the pictures sized for wooden blocks. The Duplo pictures are great for adding to your building area and they stick together so there isn't really much balancing, just building. 

Build it up, but don't knock it down! 


For older students, I added some worksheet options to go with the activities including pages for retelling, creative writing, problem solving, main idea and story elements. There are MANY different options for each, which makes for easy differentiation! 


I also collected these great dramatic play props so that the children can act out the story!


How to Make your iPad into a Secret Message Decoder


I recently discovered that I can set my iPad or iPhone up to decode Secret Message activities!

This means that if you have a newer Apple device, with iOS10 or higher, you don't need to purchase one of the decoder options or spend time making a decoder; simply follow the directions below to adjust the color settings on your device and then set a shortcut so that you can access the Red Tint  setting quickly!

First, you need to enable the 'Red Tint' setting.

Go into SETTINGS - GENERAL - ACCESSIBILITY - DISPLAY ACCOMMODATIONS - COLOR FILTERS. Next, click the toggle at the top to turn on the color filters option.


Scroll down until you see sliders for Intensity and Hue; slide both all the way to the right for red. The red tint will not show up in pictures or screenshots, but will alter what can be seen through the camera on the screen.


Your screen will look a bit like this with the red tint on:


For quick and easy access to this setting, you'll want to set up a shortcut.

Go into SETTINGS - GENERAL- ACCESSIBILITY - ACCESSIBILITY SHORTCUT. Click on the 'Color Filters' option on the list. Now the red tint setting can be easily accessed by triple clicking the home button. If you have multiple accessibility shortcuts set up, you'll need to choose the Color Filters option from the list


When you go to use your shortcut, you'll press the home button quickly three times. Depending up on what app you have open, you might have to choose 'Color Filters' from a list of shortcuts you have set up. It looks like this:


Now you're ready to use your device to reveal the hidden words in one of my Secret Message Literacy Centers! But before you get started, I highly suggest making sure that your device is well protected just incase it's dropped!


Simply turn on the Red Tint setting and then go to the Camera App. Point the camera of your device at one of the Red/Blue Secret Message cards to reveal the hidden word; you will be able to view the word on the screen of your device like this:


Give this activity a try with this FREEBIE! It includes the first 10 Fry Sight Word Secret Message cards, 3 different recording worksheets and an answer key.


For more Secret Message activities check out THESE posts: 


Spring Math Centers: Whimsical Recipes


In March, as we all impatiently waited for spring to arrive, I brought a huge bag of silk flowers to the classroom for the kids to explore. With snow on the ground and colder than average temperatures outside, we had colorful little reminders inside that spring *should* soon be on its way.

Initially, my idea for the flowers was to sort by color and create rainbow designs and patterns, but my students had different ideas... and began cooking with them in the play kitchen area one day during yet another indoor recess. They made a colorful mess of flowers filling every pot, pan and cup available. The kids served up flower tea, flower muffins, flower cake, flower pie, flower pizza and much more! My students became a little obsessed with the flower cooking so I began exploring how I could sneak in a little play-based math practice. 

At first, I scribbled some quick Flower Pie recipes on scrap paper with markers and showed them how they could record their own recipes by drawing pictures.


Before I knew it, students were creating their own recipes, drawing their pie creations, talking about numbers and making comparisons all on their own!

The following weekend, I sat down and created this huge pack (there are over 100 pages!) of play-based math activities using silk flowers and other materials that can easily be found at the Dollar Tree (or maybe even things you already have in your own kitchen at home or supply closet at school)!  I introduced the activities a few weeks ago and they've been a huge hit.

Contents

Since I have such a wide range of ages and abilities in my own classroom, I created activities that are easily differentiated and enticing to students between Preschool and Kindergarten age.The simplest activities focus on visual perception and include a sort by color or size activity with printable vases for sorting...


... and many activities that focus on visual perception and copying skills.


There are over 50 different recipe cards that focus on counting and creating sets of up to 10 items.  Recipe cards for quantities 1-5 and 5-10 are included for flower pie, flower pizza and flower ice cream!


Several three-dimensional printables are included which require some simple assembly. Sorting 'vases' for sorting by color, size and creating sets up to 10 are included. Simply print, cut the page in half along the dotted line, roll into a tube and tape the edge where marked. Along with the Flower Ice Cream activity, I've included a template for an ice cream cone. Simply print, cut around the edge of the template, roll into a cone shape and tape or glue the edge where marked.


Each activity also has a 'make your own' option (in color or black and white) where students can fill in the numerals to create their own recipes, place the flowers on or draw a picture of their recipe.


Materials

You'll need to purchase an assortment of silk flowers and some inexpensive props to go with the activities. Silk flowers can be found relatively cheaply at the Dollar Tree; look for stems that have smaller flowers with many blooms for the counting activities. You'll need the following colors: pink, red, orange, yellow, blue, purple and white. Blue flowers were the most difficult to find, but with a little searching I was able to find enough.  I bought about 2 stems of flowers for each color spending between $12-14. Leave the flowers on the stems for the color, size and counting vases activities; remove the flowers from the stem for the recipe card activities.

Depending on which activities you want to do with your group, you might need a pie pan, a pizza pan, a muffin tin with 6 spaces and a muffin tin with 12 spaces; I found everything except the 12 space muffin tin at the Dollar Tree. I think that I purchased my 12 space muffin tin from a thrift store for less than $2.

Lastly, I made a pie crust and pizza crust for my activities out of an old tan sweater by tracing my pan and cutting out a circle. If you don't have an old tan sweater (who knows why I had it laying around!) you could use tan felt or fleece from the fabric store (the edges of these fabrics will not fray and do not need to be hemmed); take your pan to the store with you so you know exactly how much to buy.

I also made this lattice-top crust (completely optional!) for my activity by cutting a second circle into 1/4-1/2" strips, arranging them in a crisscross, over/under pattern and hot gluing where the strips overlapped.


Check out this YouTube video for instructions on how to make a lattice-top crust design:


Prep

Most of the material prep is pretty simple. Just print, laminate and cut. If you print the recipe cards as they are, most of them are 1/2 a page (2 per page). I found that I preferred most of them smaller and adjusted my print settings to include two pages per sheet (4 cards per page); printing the cards smaller also saves on supplies including ink, card stock and lamination!

If you're not sure how to adjust the print size to two pages per sheet, this video by 3rdGrThoughts explains it well: